If you find that your home damp or if you struggle to maintain a desired temperature in your home you may have damaged weather stripping on your doors or windows. The inability to maintain a desired temperature in your home or apartment can result in astronomical utility bills and be incredibly frustrating. Dampness in the home can lead to illness and damage to family heirlooms and other personal items.
Next time it is windy or rainy trace your hands along the outline of your door or window to determine if the weather stripping is really damaged or if it another problem. If you are positive that weather stripping is damaged you can begin the process of replacing the weather stripping. You should start your project with a quick trip to your local hardware store where you should pick up nails, a nail set, and weather stripping materials.
Remove your old weather stripping and do a thorough job of washing down the area. Use liquid detergent and hot soapy water and wash away dirt and dust. Measure your new weather stripping against the sides of the door or window. Add an additional two inches to each edge so they can fold around corners and protect you if you happen to measure incorrectly.
It is now time to replace the weather stripping. Place your weather stripping into place and nail it down securely so that when you open and close your window or door it stays properly secure. Don't use the hammer to completely pound in the nails; this can damage the weather stripping. You'll instead want to use the nail set to finish placing the nails and avoid damaging the wather stripping.
Checking your weather stripping regularly can help you to avoid having to do a complete redo job. When you annually check your weather stripping you should check for frayed edges, loose nails and decay. If you notice frayed edges you can trim the edges and use a nail polish to seal the edges so that it does not continue fraying. Using hot soapy water can help you wash away materials that encourage decay. Loose nails can lead to damage, so replacing those nails or reinstalling them will help you avoid the costly replacement effort.
By learning how to simply replace your weather stripping you can ease any financial burden associated with hiring a professional. Remember to check your weather stripping annually and you will save even more on the materials you may need to replace your own weather stripping. Your friends and family will thank you for your new skills!

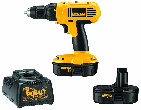
Cordless, Compact, and Powerful! DeWalt's 18-volt drill-driver kit packs a big punch in a small package, with a powerful high-performance motor tucked away inside a compact design. A great addition to the tool chest of any professional or DIYer! Check out DeWalt 18-Volt Drill/Driver Kit today!
A squeaky door results from a squeaky hinge. Lubricate all parts of your door hinge and then reinstall the door. Chances ...
Discover MoreOver time just about everything in your home will need to be repaired, even the little strike plate on your door. ...
Discover MoreInstead of completely replacing a door, and spending loads of money that could be better used on a different project, why ...
Discover MoreThere are currently no comments for this tip. (Be the first to leave your comment—just use the simple form above!)
Copyright © 2025 Sharon Parq Associates, Inc.
Comments